Most Guys Wearing Suits Think They Look Fine. Most of Them Are Wrong.
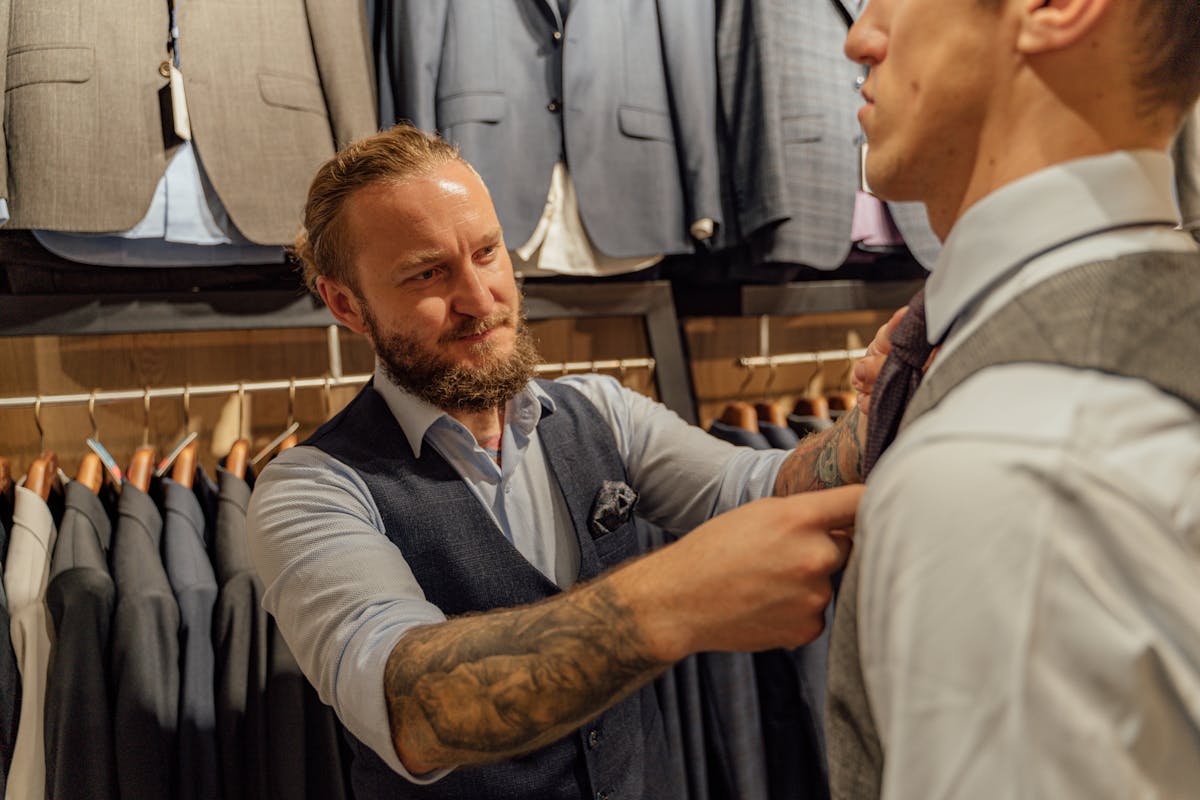
I have been making suits for over 25 years. I have lived in Pennsylvania, New York City, and Houston. I now live in Hoi An, Vietnam, where I work with Nathan Tailors -- a shop that has fitted more than 5,000 clients worldwide. And I can tell you this with complete confidence: the majority of men wearing suits right now are wearing suits that do not fit them.
Not horribly. Not clown-suit bad. Just... off. The shoulders are a little too wide. The jacket is a little too long -- or too short. The trousers pool at the ankle. The chest pulls when they button up. It is the "close enough" problem, and it is everywhere. Walk through Midtown Manhattan at lunch, or any financial district in any major city, and you will see it on eight out of ten guys.
The reason is simple: most men have never been shown what a properly fitting suit actually looks like. They bought a suit, looked in a mirror, thought "yeah, that looks like a suit," and moved on. Nobody taught them what to check. No one told them what how should a suit fit actually means in specific, measurable terms.
That is what this guide is for. I am going to walk you through every part of a suit -- shoulders, chest, jacket length, sleeves, trousers, collar, back panel -- and show you exactly what right looks like, what wrong looks like, and what can be fixed versus what means the suit is simply wrong for your body. No vague advice. No "it should feel comfortable." Specific checkpoints you can use in front of your own mirror, today. And where the rules come from the trade rather than from me, I have cited the tailoring authority so you can check my work.
The 5-Second Suit Fit Check
Before we go deep, here is a quick self-assessment. Put on your suit jacket, button the top button (or the middle button on a three-button), and stand naturally in front of a full-length mirror. Do not suck in your gut. Do not square your shoulders. Just stand the way you actually stand.
Now check these five things:
- Shoulders: Does the shoulder seam sit right at the edge of your shoulder bone, or does it hang over the edge or pinch inward?
- Chest: Can you slide a flat hand between the buttoned jacket and your chest without straining? If not, it is too tight. If you can fit a fist, it is too loose.
- Jacket length: Does the bottom of the jacket cover your seat (backside) completely? Can you curl your fingers around the hem when your arms hang naturally?
- Sleeves: Is there about a quarter to half inch of shirt cuff visible below the jacket sleeve?
- Trousers: Is there a clean line from waist to shoe with one gentle break (fold) at the ankle, or are they pooling on your shoes like curtains?
If you answered "no" to even one of these, your suit does not fit properly. You are not alone -- and you are not stuck. Let me walk through each checkpoint in detail so you know exactly what to look for and what to do about it.
Shoulder Fit -- The Point-to-Point Rule

If I could only check one thing on a suit, it would be the shoulders. Shoulders are the foundation of the entire jacket. If the shoulders are wrong, nothing else matters -- no amount of alteration on the chest, waist, or sleeves will make the jacket look right. The shoulders are also the single most expensive and difficult thing to alter, which is why getting them right at the start is critical. Tailors are blunt about this: reshaping a shoulder "involves major surgery" on the garment, and making shoulders bigger or smaller simply is not recommended.3
What Correct Shoulder Fit Looks Like
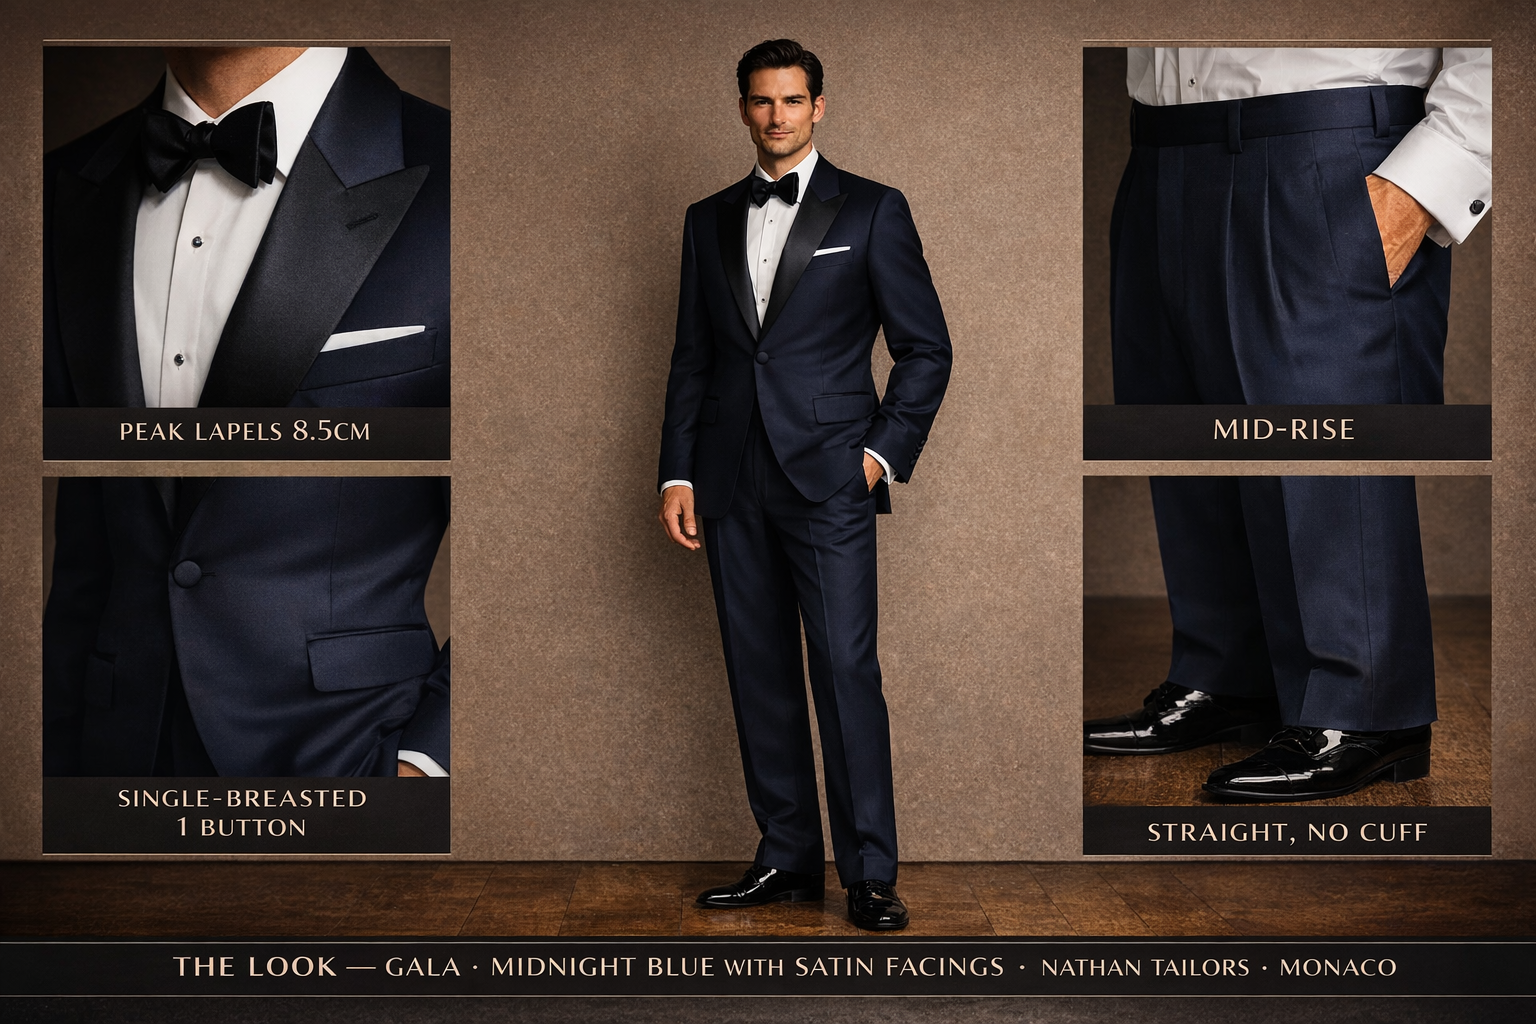
Tailors call the rule "point-to-point" fit: the shoulder seam -- the seam that runs along the top of the jacket where the shoulder meets the sleeve -- should end exactly where your shoulder bone drops off and your arm begins.2 That bony prominence at the outer edge of your shoulder is the acromion point, and the seam should align with it precisely.5 Press on the top of your shoulder and slide your finger outward until you feel the bone end and the arm begin. That is where the seam should sit.
When the shoulder fits correctly, the fabric lays flat across your upper back and the top of your shoulder. There are no dimples, no bumps, no pulling. The sleeve falls straight from the seam without bunching or gaping at the top.
What Too Wide Looks Like
The shoulder seam extends past your shoulder bone and hangs over the edge of your shoulder, sometimes by half an inch or more. You will see a visible dip or dimple -- a shoulder divot -- right where the seam ends and the sleeve begins. The jacket looks like it was made for someone broader than you. The sleeves may also appear too long because the whole jacket is sitting too far out on your frame.
What Too Narrow Looks Like
The shoulder seam sits on your arm, not on your shoulder. It pulls the fabric tight across your upper back. You feel restricted when you reach forward or lift your arms. Diagonal pulling lines appear across the upper chest. The armhole sits too far inward and cuts into your underarm.
Of every measurement on a suit, the shoulder is the one a tailor mostly cannot rescue -- which is exactly why it has to be right before you buy.
Here is the uncomfortable truth: if the shoulders are wrong by more than half an inch in either direction, the suit cannot be economically altered. The shoulder is the one part of a jacket that typically cannot be altered after construction.2 Restructuring it requires deconstructing the entire upper half of the jacket -- removing both sleeves, repositioning the shoulder pads, reshaping the armholes, and reattaching everything. A competent tailor will charge $200-$350 for this, and the result is still a compromise. At that point you are better off with a suit that was cut for your shoulders from the start.
We have a detailed shoulder measurement guide with visuals if you want to learn how to measure your own shoulder width precisely.
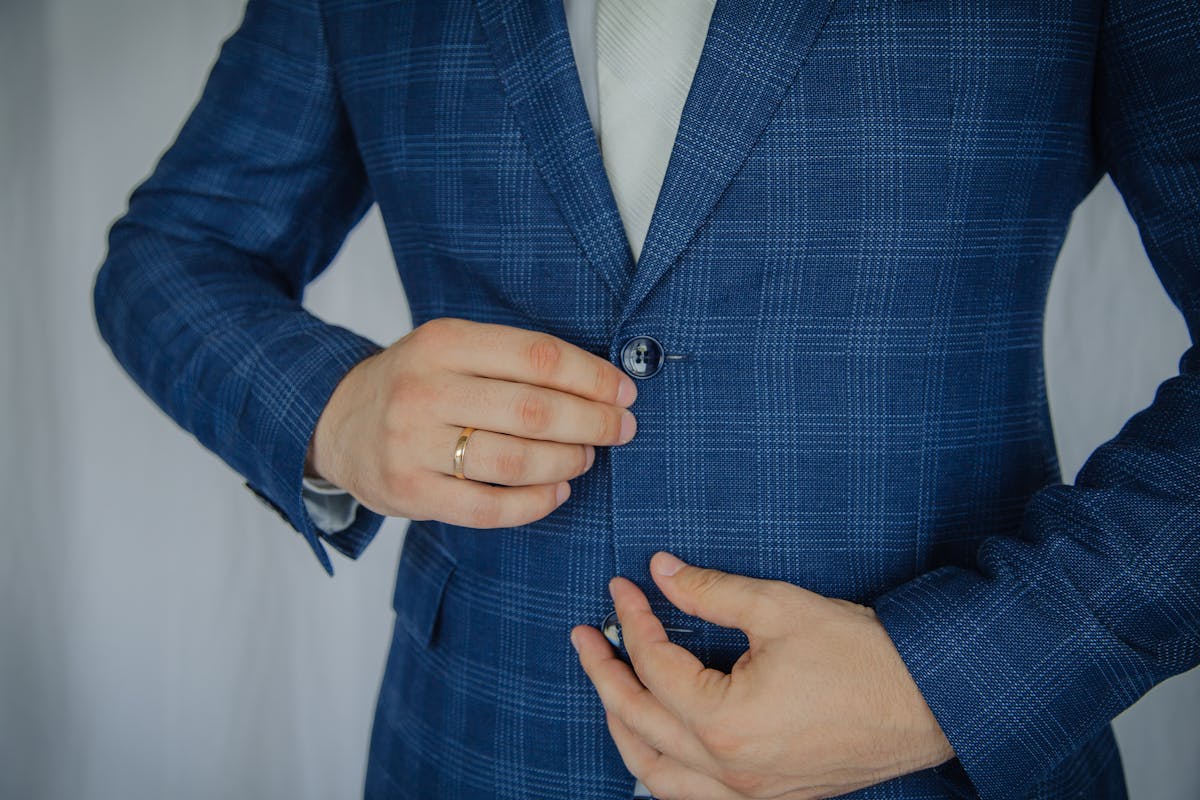
Chest and Torso Fit -- The Button Test
The chest is where most off-the-rack sizing compromises happen. You pick your jacket size based on your chest measurement -- a 40R, 42R, whatever -- but that number assumes a specific ratio between your chest, waist, and hips that may have nothing to do with your actual body.
The Flat Hand Test
Button the jacket (top button on a two-button, middle on a three-button). Now slide your flat hand, fingers together, between the jacket front and your shirt, right at the chest. You should be able to slide your hand in comfortably without straining the fabric. If you cannot get your hand in, the jacket is too tight in the chest. If you can fit a closed fist, it is too loose.
The X Test
With the jacket buttoned, look at the button area in a mirror. Do you see horizontal pulling lines radiating outward from the button in an X pattern? Not the subtle, natural suppression lines that indicate a fitted waist -- the aggressive, straining pulls that make it look like the button is about to launch across the room.
That X-shaped pull means the jacket is too tight in the midsection. This is the classic off-the-rack trap: you size the jacket to your shoulders, but your torso proportions do not match the assumptions built into that size. A 40R at SuitSupply assumes a specific chest-to-waist ratio. If your waist is wider than that ratio predicts, you get the X pull. If you size up to fix the waist, the shoulders are suddenly too wide.
This is the fundamental problem with sizing systems. You are choosing a number, not getting a fit. Your shoulder width, chest circumference, and waist are three independent measurements that may not align with any standard size. In a properly fitted suit -- whether custom or well-altered -- each dimension is handled independently.
Slim Fit vs. Proper Fit
A word on slim fit, since there is a lot of confusion here. Slim fit does not mean tight fit. A slim-fit jacket should follow the contours of your body more closely, with less drape and less ease through the midsection. But you should still be able to move, sit, breathe, and button the jacket without the fabric straining. If you feel like the jacket is fighting you, it is too small -- regardless of what the tag calls it.
For 2026, the trend has actually shifted away from the ultra-slim cuts that dominated the last decade toward a more relaxed, natural silhouette -- slightly wider shoulders, moderate chest ease, fuller trousers. If your current suits are skin-tight, they may be both poorly fitted and out of style.
See our chest measurement guide and bicep measurement guide for how to take accurate upper-body measurements at home.
Jacket Length -- The Knuckle Rule
Jacket length is one of the most commonly botched fit points, and it is easy to check. Stand with your arms hanging naturally at your sides. The bottom of the jacket should hit right at the point where your fingers curl -- roughly at your knuckles.2 Another way to check: the jacket should fully cover your seat when viewed from behind.2
Too Short
If the jacket does not cover your seat, it is too short. This was fashionable during the ultra-slim era of 2014-2022 -- cropped jackets that barely covered the belt. In 2026, this looks dated. A too-short jacket also makes your legs look disproportionately long relative to your torso, which disrupts the visual balance that makes a suit look effortless.
Too Long
If the jacket extends significantly below your knuckles or past mid-thigh, it is too long. This makes you look shorter than you are and gives the jacket a boxy, borrowed-from-someone-bigger appearance. The proportions are off, and no amount of tailoring elsewhere will fix the visual effect.
The Back Check
Have someone look at the back of your jacket or take a photo. The jacket should hang straight from the shoulders to the hem without riding up in the back (a sign that the jacket is too short or your posture is creating a balance issue) or draping excessively (too long). The vent or vents at the back should hang closed when you are standing still -- if they splay open, the jacket is too tight in the hips or seat.
Important note: Jacket length is extremely difficult to alter. A tailor can shorten a jacket by up to about an inch, but lengthening is almost impossible because there is no extra fabric hidden in the hem the way there is with trousers. If the jacket length is wrong by more than an inch, you likely need a different size or a custom jacket.
Sleeve Length -- The Quarter-Inch Rule

Sleeve length is one of the easiest things to check and one of the most common things that off-the-rack gets wrong. Here is the rule: the jacket sleeve should reveal about a quarter to half inch of shirt cuff.2 That clean, deliberate show of cuff tells the world your suit actually fits.
How to Check
Put on the shirt you would normally wear with the suit. Make sure the shirt sleeves are properly buttoned. Now put on the jacket and let your arms hang naturally. Look at the cuff area. You should see a sliver of shirt cuff -- about a quarter to half inch -- peeking below the jacket sleeve.
Why Off-the-Rack Gets This Wrong
Off-the-rack jackets come in standard sleeve lengths based on your jacket size. A 40R assumes a specific arm length. But arm length varies enormously between people of the same chest size. Two guys who both wear a 40R chest can have arm lengths that differ by two inches. And it gets more personal than that: peer-reviewed anthropometric work on the human skeleton finds that the dominant-side (usually right) arm is measurably larger -- in bone length, weight, and circumference -- and that the upper limbs are more asymmetric than the lower ones.6 Off-the-rack sleeves are cut symmetrically, identical left and right, which is precisely why one cuff so often lands perfectly while the other does not. This is why almost every off-the-rack suit needs sleeve alteration -- and many guys skip this step because they do not realize the sleeves are wrong.
If your jacket sleeves are too long and cover your shirt cuff entirely, you look sloppy. If they are too short and show two inches of shirt cuff, you look like you outgrew the jacket. Neither is the end of the world -- sleeve shortening is one of the simplest and cheapest alterations a tailor can do, typically $20-$40. Tailoring authorities rank sleeve length as the easiest part of a jacket to change.3
Our sleeve measurement guide shows you exactly how to measure from shoulder seam to wrist bone for a precise sleeve length.
Trouser Fit -- Waist, Thighs, and the Break
Suit trousers are where a lot of guys stop paying attention. They focus on the jacket and treat the trousers as an afterthought. But poorly fitting trousers will undermine even a perfect jacket. Here is what to check.
Waist Fit: The Sit Test
Put on the trousers, fasten them, and sit down in a chair. Not perched on the edge -- actually sit back the way you sit at your desk. The waistband should stay comfortable. You should not feel like it is cutting into your stomach, and it should not be so loose that it gaps away from your body when you stand up. If you need to unbutton after lunch, the waist is too tight.
The good news on trousers: the waist is forgiving. Most suit trousers carry a built-in seam allowance, so a tailor can take the waist in or let it out by a couple of inches as a routine job.3 Trouser waist should sit at your natural waist -- the narrowest point of your torso, usually about an inch above your navel. This is higher than where most guys wear their jeans. Suit trousers worn too low on the hips create excess fabric in the seat area and a bunching effect at the crotch. Worn at the natural waist, the trousers drape cleanly from waist to shoe.
Our waist measurement guide and hip measurement guide will help you get precise numbers for both areas.
Thigh Room
You should be able to pinch about an inch of fabric on each side of your thigh when standing. This gives you enough room to walk, sit, and climb stairs without the fabric pulling tight across your quad. Too tight, and you will see horizontal creases across the front of the thigh. Too loose, and the trousers look billowy and undefined.
If you have athletic thighs -- common if you squat, cycle, or play sports -- standard trouser cuts will almost always be too tight in the thigh while being fine in the waist. This is another area where custom tailoring solves a problem that off-the-rack simply cannot. See our thigh measurement guide for accurate upper-leg measurement technique.
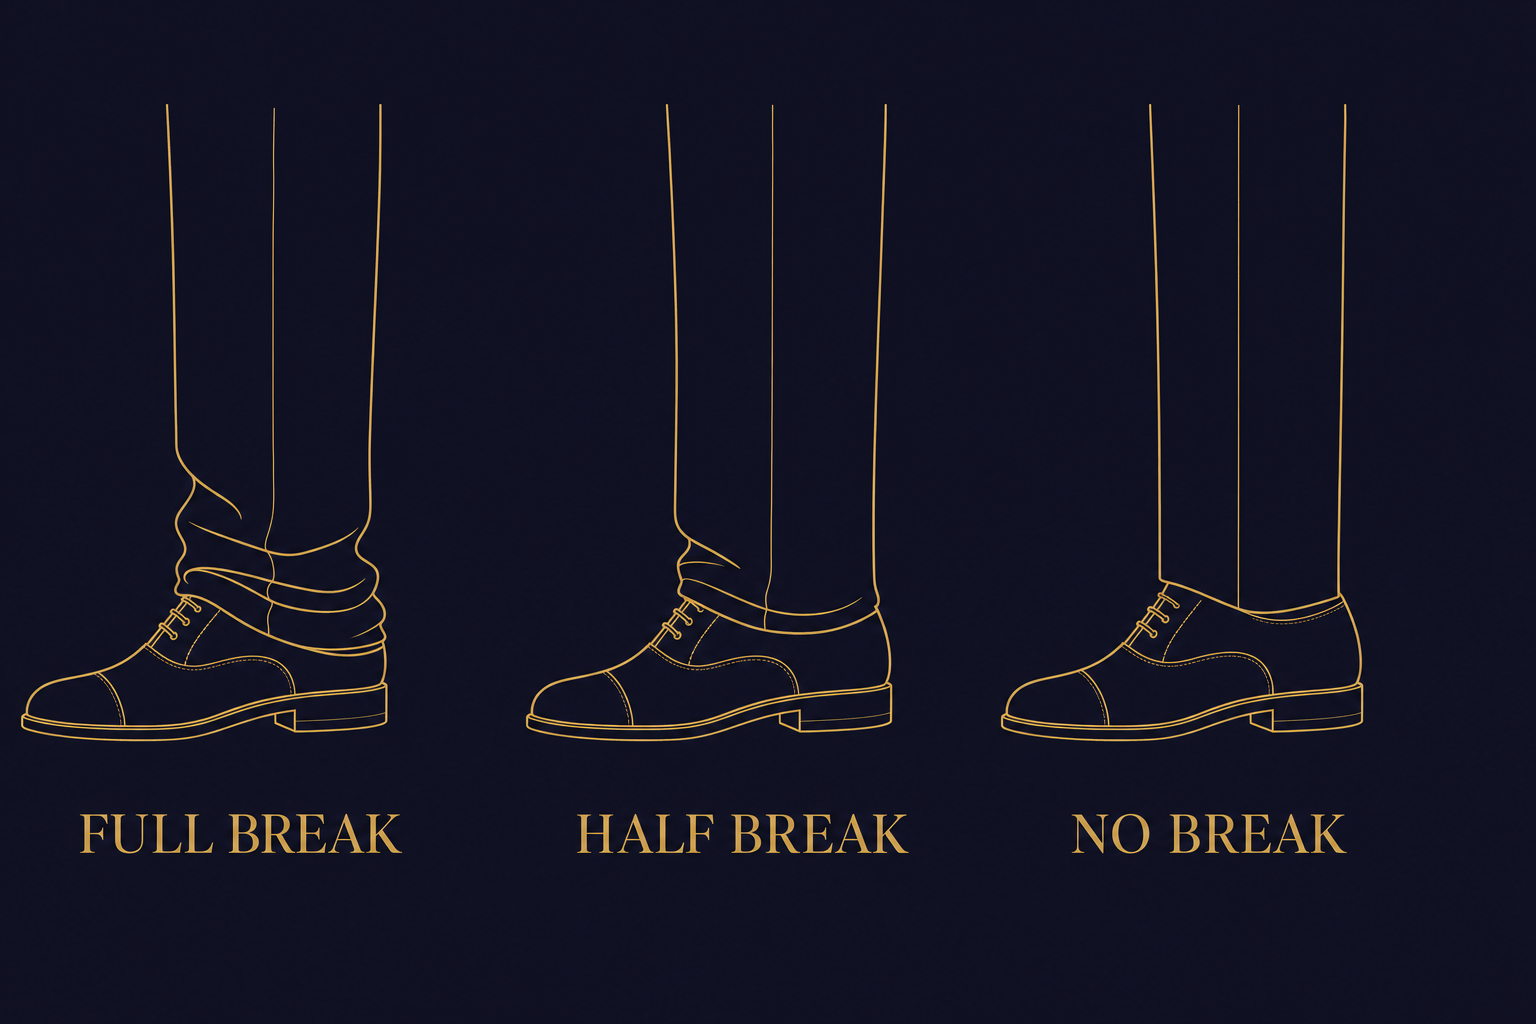
The Break: Full, Half, or No Break
The "break" is the fold or crease that forms in the trouser fabric where it hits your shoe. This is one of the most visible aspects of trouser fit and also one of the most personal. There are three options:
- Full break: A prominent fold at the ankle, with the trouser fabric resting on the shoe and creating a visible crumple. This was standard in traditional suiting and is still appropriate for conservative environments. The trouser will cover the top of the shoe almost entirely.
- Half break: A slight fold at the front of the trouser where it meets the shoe. The trouser just kisses the shoe without pooling. This is the most versatile option and what I recommend to most clients -- it looks clean standing and sitting.
- No break: The trouser hem sits right at the top of the shoe without touching. Clean, modern, works well with slim and tapered cuts. Can look too short if the trousers ride up when sitting.
For 2026, a half break is the safe middle ground. No break works for a modern silhouette. Full break is increasingly rare outside of very traditional settings. Whatever you choose, the hem should be level all the way around -- not shorter in the front and longer in the back (a sign the trousers need hemming) or bunching unevenly. Hemming, like waist adjustment and tapering, is routine work for any tailor.3
Use our inseam measurement guide to determine your exact inseam length for a precise trouser break.
Collar and Lapel -- The Tell-Tale Signs of Bad Fit

The collar and lapel area is where bad fit becomes most visible, because it is right at eye level. When someone looks at you in a suit, their eyes go to your face first and then to your collar and lapel. If something is off here, everyone notices even if they cannot name what is wrong.
Collar Gap
This is the gap between the jacket collar and your shirt collar at the back of your neck. In a properly fitting jacket, the collar sits snugly against the back of your neck, with the shirt collar peeking out about half an inch above the jacket collar. If there is a visible gap -- you can see space between the jacket collar and your neck, or the collar is lifting away from you -- you have a collar gap.
Collar gap is most commonly caused by one of two things: posture or incorrect back balance. If you have forward-leaning posture (extremely common in anyone who works at a desk), the back of the jacket rides up because it was cut for an upright stance. The jacket effectively becomes too short in the back and too long in the front, and the collar lifts away from your neck as a result.
A skilled tailor can sometimes fix collar gap by adjusting the back balance of the jacket -- essentially shortening the back panel slightly and redistributing the fabric. But this is a significant alteration that not every tailor is equipped to do. In a custom suit, the back balance is adjusted from the start based on your posture photos.
Check our neck measurement guide for proper collar sizing that prevents this issue.
Lapel Lay
The lapels of the jacket should lay flat against your chest all the way from the collar down to the button. If the lapels bow outward, creating a visible gap between the lapel and your shirt, you have lapel gape. This is extremely common in guys with athletic builds -- big chest, narrow waist. The jacket cannot reconcile the volume difference, so the lapel lifts away from the body.
Lapel gape is a structural issue with the jacket's chest pattern. It is not fixable with simple alterations. If your lapels do not lay flat, the jacket was not cut for your body proportions.
The Back -- Where Most Guys Never Look

Here is a secret: you spend half your time with your back to people. In meetings, walking down a hallway, standing at a bar. The back of your jacket tells people just as much about your fit as the front. But most guys never check it because they only look in the mirror from the front.
What a Clean Back Looks Like
The fabric should drape smoothly from the shoulders to the hem without any horizontal creases, vertical bunching, or pulling. The center seam (if visible) should run straight down the middle. The vents -- whether single, double, or none -- should hang closed when you are standing still.
What Problems Look Like
- Horizontal creases below the collar: The jacket is too tight across the upper back or the armholes are too small. You need more room through the back or larger armholes.
- Vertical creases running from shoulder to hem: There is excess fabric in the back. The jacket is too wide through the body.
- Vents splaying open: The jacket is too tight in the hips or seat. The vents should hang closed, not fan out like wings. This is especially common in guys who size their jacket for their chest but have a larger seat.
- Fabric bunching at the lower back: Often a balance issue where the jacket back is too long for your posture. Common in people with an upright or slightly swayback posture.
Have someone take a photo of you from behind with the jacket buttoned. This five-second check reveals problems you would never spot in a front-facing mirror.
Common Fit Problems and Fixes
Here is a reference table for the most frequent suit fit issues I see. For each problem, I have listed what causes it and whether it can be fixed with alteration or whether you need a different suit entirely. The ordering -- sleeves and hems cheap and easy, shoulders and armholes expensive and structural -- tracks exactly how tailoring authorities rank these jobs.3
| Problem | What You See | Cause | Fix | Alterable? |
|---|---|---|---|---|
| Shoulder Divots | Dimples or dents where shoulder meets sleeve | Shoulders too wide for your frame | Need different size or custom | Rarely -- $200-$350 and results vary |
| Collar Gap | Space between jacket collar and neck at back | Forward posture or wrong back balance | Back balance adjustment by skilled tailor | Sometimes -- $75-$150 |
| X-Shaped Pull | Aggressive pulling lines from button area | Jacket too tight in midsection | Let out side seams (if seam allowance permits) or size up | Sometimes -- $40-$80 |
| Lapel Gape | Lapels bow away from chest | Chest-to-waist ratio mismatch in pattern | Need different cut or custom | Rarely -- structural issue |
| Back Bunching | Excess fabric pooling at lower back | Jacket too long in back or posture issue | Take in back seam or adjust balance | Yes -- $50-$100 |
| Sleeves Too Long | No shirt cuff visible, sleeves cover hands | Standard sleeve length does not match your arms | Shorten sleeves | Yes -- $20-$40 (easiest alteration) |
| Trouser Pooling | Excess fabric bunching at ankles over shoes | Trousers too long (wrong inseam) | Hem trousers to correct length | Yes -- $15-$25 (simplest alteration) |
| Vents Splaying Open | Back vents fan out instead of hanging closed | Jacket too tight in hips or seat | Let out hip area (if allowance exists) or size up | Sometimes -- depends on construction |
| Sleeve Twist | Sleeves rotate forward or backward instead of hanging straight | Wrong sleeve pitch angle for your arm rotation | Reset sleeves at correct angle | Technically yes -- $100-$175, risky |
The pattern here is clear: the things that cost the least to alter are the things most guys ignore (sleeves, hem), and the things that matter most for your appearance (shoulders, collar, lapel) are the most expensive and difficult to fix. This is why getting the structural elements right from the start matters so much more than people realize.
If your current suit has issues in the "rarely alterable" column, read our guide on what to do when a custom suit does not fit -- it explains the resolution process in detail.
Off-the-Rack vs. Made-to-Measure vs. Bespoke: What Does Fit Quality Actually Mean?
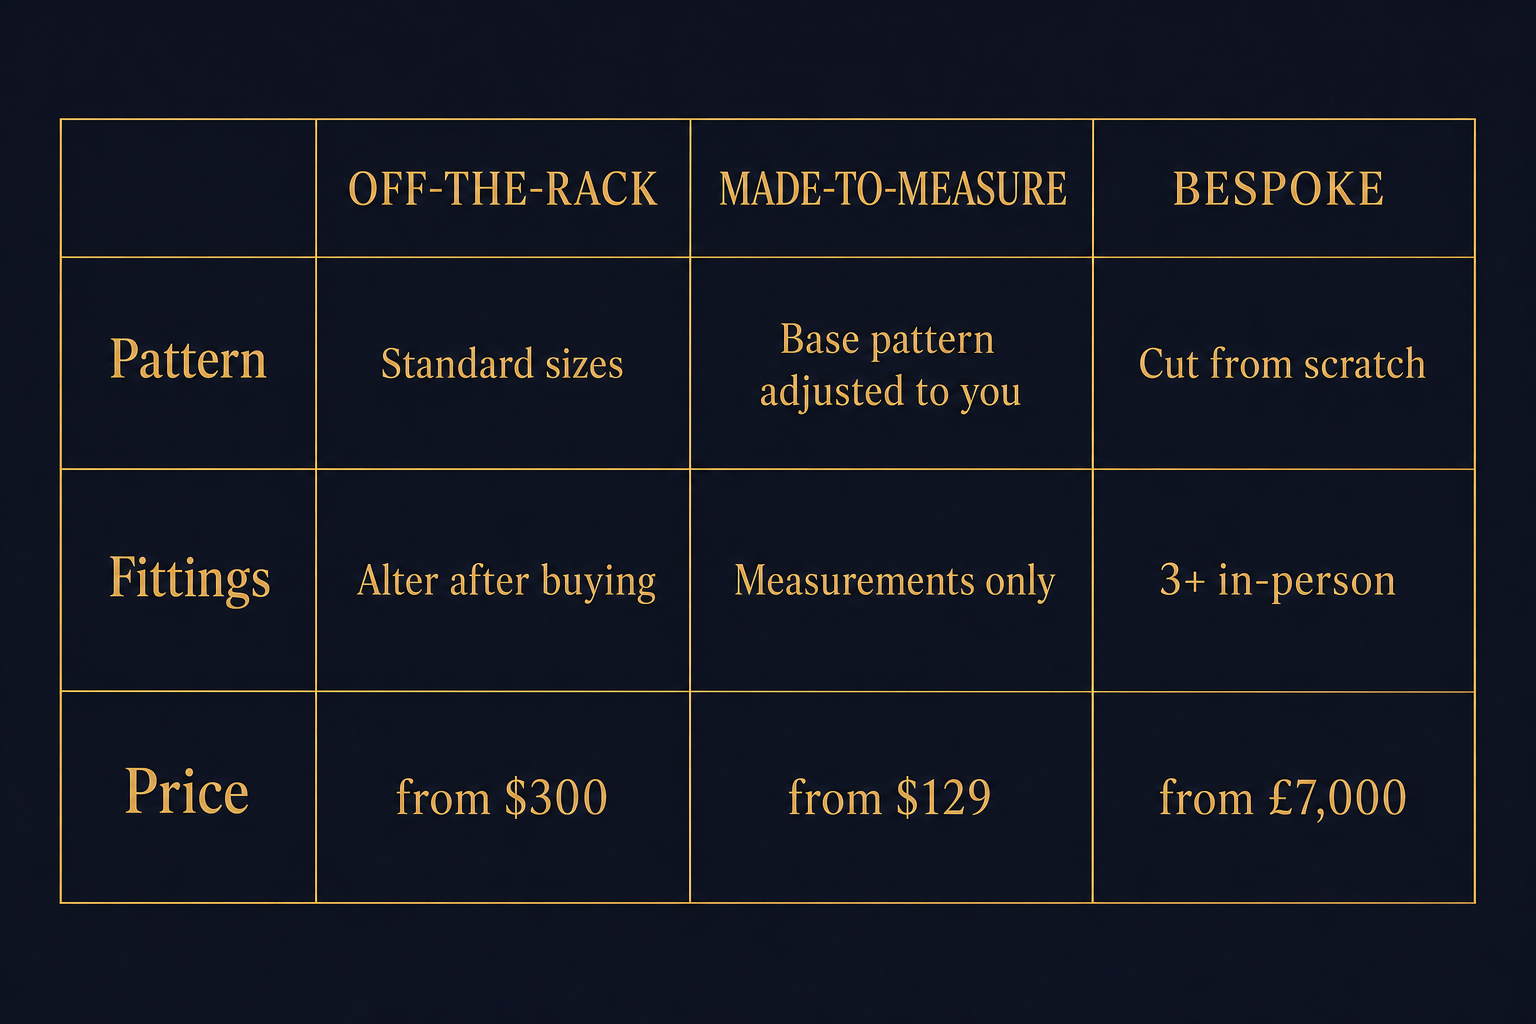
These three categories get thrown around a lot, and the differences in fit quality are significant. Let me be honest about each one.
Off-the-Rack (OTR)
The suit is manufactured in standard sizes (38R, 40R, 42L, etc.) based on average body proportions. You pick the closest size and then alter from there. If your body happens to be close to the manufacturer's assumed proportions, OTR can work fine. Some guys get lucky -- they are the right height, the right chest-to-waist ratio, the right shoulder width for a standard 42R, and the suit fits them reasonably well with just a sleeve and hem adjustment.
But most people are not standard. Most people have one or two body dimensions that fall outside the assumptions: wider shoulders with a narrower waist, longer arms than their chest size predicts, one shoulder higher than the other, a forward lean from years of desk work. This is not a vague claim -- it is measurable. Skeletal studies find the human body is reliably asymmetric, with the dominant side larger and the upper limbs more lopsided than the lower ones.6 Each of these variations means the OTR suit will compromise somewhere -- and that compromise is what you see as fit problems.
OTR suits range from $300 to $1,500+ for quality brands like SuitSupply or Brooks Brothers. Budget another $75-$200 for alterations to get it as close as possible.
Made-to-Measure (MTM)
A base pattern is adjusted using your individual measurements. This is the category that brands like Indochino and Nathan Tailors operate in. You provide measurements -- either taken in a showroom, via guided video, or at home -- and the suit is cut specifically for your dimensions.
The fit quality of MTM depends entirely on two things: how many measurements are taken and how skilled the tailor is at interpreting those measurements. A brand that takes 12 measurements will produce a better fit than one that takes 6. A tailor who has fitted 5,000 people will spot and correct for posture issues that a less experienced cutter will miss.
MTM prices range from $399-$699 at brands like Indochino, $499-$1,299 at SuitSupply, and from $149 at Nathan Tailors -- the difference being overhead, middlemen, and retail rent rather than construction or fabric quality.
Bespoke
A pattern is created from scratch for your body, with multiple in-person fittings. This is the gold standard of fit. A genuine Savile Row bespoke commission -- Huntsman, for example -- involves a minimum of three fittings, is made entirely by hand, and starts from £7,000 for a two-piece.1 The cutter adjusts the pattern at each fitting based on how the cloth drapes on your specific body. The result is a suit that fits like a second skin.
It is the best fit money can buy. But at roughly £7,000 and up, it is on the order of 10-30x the price of well-executed made-to-measure -- which, for most people, delivers the great majority of the fit quality at a fraction of the cost. The point of bespoke is not that the others are bad; it is that the last few percent of perfection is expensive. If you are not commissioning from Savile Row, MTM is where the value lives.
When to Walk Away -- Fits That Cannot Be Fixed
This is the section most fit guides leave out, and it might be the most important. Some fit problems cannot be solved with alterations. The suit is structurally wrong for your body, and no tailor can fix it without essentially rebuilding the garment -- at which point you would be paying more for the alteration than the suit is worth.
Walk away from a suit if:
- The shoulders are more than half an inch too wide or too narrow. Shoulder restructuring is the most invasive and expensive alteration, and the shoulder is the one part of a jacket that typically cannot be altered at all.2 If the shoulders are significantly wrong, the suit was not made for your frame.
- The chest is too small (not too big -- too small). A jacket that is too big in the chest can be taken in. A jacket that is too small cannot be let out more than about half an inch, because there is not enough seam allowance in most off-the-rack suits. If you cannot button the jacket comfortably, go up a size.
- The overall jacket length is wrong by more than an inch. Shortening a jacket by more than an inch risks throwing off the pocket placement and button stance. Lengthening a jacket is essentially impossible. If the length looks wrong, try a different size (Regular vs. Short vs. Long) or a different brand with different proportions.
- The armholes are too low. Low armholes are standard in ready-to-wear because they are easier to manufacture and fit a wider range of bodies, but they restrict movement and create excess fabric under the arms. A high, narrow armscye -- the custom advantage -- lets you raise your arms without the whole jacket flailing, and it reads slimmer; Parisian Gentleman calls it a hidden secret of elegance with spectacular ergonomic impact.4 The catch is that you cannot add it after the fact: raising an armhole essentially requires re-making a huge portion of the jacket, because the waist, length, button stance, gorge, and pocket placement all shift when the shoulder is lifted,3 and a higher armscye is simply impossible to have made on an off-the-peg suit, no matter how luxurious.4
- The trouser rise is fundamentally wrong. If the crotch of the trousers hangs two inches below where it should, no alteration fixes that. You need a different cut.
None of this means you have to spend thousands of dollars. It means the specific suit you are looking at was not designed for your body. A different brand, a different cut, or a made-to-measure option that starts from your measurements instead of from a generic size will fit better -- even at the same or lower price.
The Proper Suit Fit Checklist
Here is a summary you can use every time you try on a suit -- whether in a store, at a tailor, or when a custom suit arrives in the mail. Go through each checkpoint. If everything passes, you have a well-fitting suit. If one or two things are off and they are in the "easily alterable" category (sleeves, hem, waist), get them fixed -- it is worth $30-$60 to make a good suit fit properly.
- Shoulders: Seam at shoulder bone edge (point-to-point). No divots. No overhang. No pulling.
- Chest: Flat hand slides in comfortably when buttoned. No X pull.
- Lapels: Lay flat against chest. No gape.
- Collar: Snug against back of neck. Half inch of shirt collar visible above.
- Back: Smooth drape. No horizontal or vertical creases. Vents hang closed.
- Jacket length: Covers seat completely. Bottom hits at knuckle level.
- Sleeves: Quarter to half inch of shirt cuff showing.
- Trouser waist: Comfortable sitting and standing. No gapping or cutting.
- Trouser thigh: Can pinch an inch of fabric on each side.
- Trouser break: Half break (slight fold at shoe) for most settings.
- Trouser hem: Level all the way around. No pooling.
Does My Suit Fit? Frequently Asked Questions
How tight should a suit jacket be?
A suit jacket should follow the contours of your body without straining. The test is practical: you should be able to button the jacket comfortably, slide a flat hand (not a fist) between the jacket and your chest, reach forward without the fabric pulling hard, and sit down without feeling restricted. If you are constantly aware that you are wearing the jacket -- if it feels like it is fighting you -- it is too tight. A properly fitted jacket feels like it is there but not demanding your attention.
Can a tailor fix a suit that does not fit?
Depends on what is wrong. A tailor can easily fix sleeve length ($20-$40 -- the easiest jacket alteration there is), trouser hem ($15-$25), waist taken in or let out ($30-$60), and minor chest adjustments ($40-$80).3 A tailor can sometimes fix collar gap ($75-$150) and back balance issues. A tailor cannot economically fix shoulder width, jacket length, low armholes, or fundamental pattern issues like lapel gape -- reshaping shoulders or raising an armhole means re-making a huge portion of the jacket.3 The rule of thumb: if the problem is in the body of the jacket (shoulders, chest structure, length), it is likely not worth altering. If the problem is at the extremities (sleeves, hem, waist), it is a quick fix. For a deeper look at fit resolution, see our guide on what happens when a custom suit does not fit.
How do I know if my suit shoulders are the right size?
Press on the top of your shoulder and find the bony point where the shoulder ends and the arm begins -- the acromion. The jacket's shoulder seam should sit right at that point; tailors call this "point-to-point" placement.25 If the seam extends past it, the shoulders are too wide. If the seam sits on your arm, they are too narrow. Another test: stand with your arms at your sides and look for dimples or divots at the shoulder-sleeve junction. If you see them, the shoulders are too wide. For precision, our shoulder measurement guide walks you through measuring your exact shoulder width at home.
What is the right trouser length for a suit?
The right trouser length depends on the break you want. For a half break -- the most versatile option in 2026 -- the trouser should create one slight fold at the front where it meets the shoe. The back of the trouser should touch the top of the shoe heel without dragging on the ground. If the fabric pools on your shoes and creates multiple folds, the trousers are too long. If they expose your socks when standing, they are too short. Our inseam measurement guide helps you determine the right inseam for your preferred break.
Should I buy off-the-rack or custom if I have an unusual body type?
If you have proportions that deviate from standard sizing -- a large chest-to-waist drop (athletic build), one shoulder higher than the other, very long or short arms relative to your chest size, or significant differences between left and right sides -- custom or made-to-measure will serve you dramatically better than off-the-rack. And "unusual" is actually the norm: peer-reviewed skeletal data shows the dominant arm is measurably longer and larger than the other, with the upper body more asymmetric than the lower.6 Standard sizes assume a proportional, symmetrical body cut identically left and right. Almost no one is built that way -- which is exactly why a symmetric off-the-rack sleeve leaves one cuff sitting wrong. That does not mean you need to spend a fortune -- custom suits start at $149 at Nathan Tailors -- but it does mean the standard sizing system was not designed for your body, and forcing yourself into it will always produce compromises.
The Bottom Line
Knowing how a suit should fit is the single most valuable thing you can learn about menswear. It does not matter whether you spend $200 or $2,000 -- a suit that fits your body properly will always look better than an expensive suit that does not. The checkpoints in this guide apply regardless of brand, price, or whether the suit is off-the-rack or custom.
If you have gone through this guide and realized your current suit has issues in the structural category -- shoulders, chest pattern, jacket length -- it may be time to consider a suit built from your measurements rather than altered from a generic size. At Nathan Tailors, we take over 20 individual measurements for every suit we make, including adjustments for posture and body asymmetry -- including the left-versus-right differences the skeletal data confirms are real. Our custom tailored suits start at $149, work with real wool from established mill suppliers across our cloth tiers, and ship to over 50 countries via DHL and FedEx.
We have fitted more than 5,000 clients worldwide, with a 5.0-star rating across 400+ reviews. If something is not right when it arrives, we work through it with you on WhatsApp -- sometimes a quick local alteration on your end, sometimes the piece comes back to us. We figure out the right step together.
If you want to talk through your fit situation, reach out on Telegram -- I personally read every message. You can also start your measurements right now with our guided measurement app, or browse our full pricing menu to see what is possible.
And if you are visiting Hoi An? Come by 127 Tran Hung Dao Street. Linda will ask you why you are so handsome, and we will get you fitted in person. It takes about 30 minutes, and you leave with the knowledge that the suit you are getting was made for exactly one person: you.